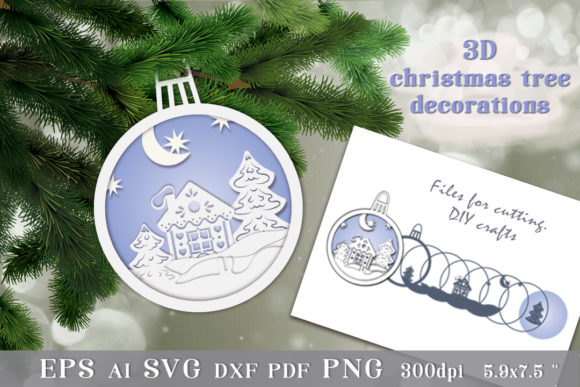
3D Christmas Tree Toy: Files to Cut for Creative Projects
The 3D Christmas Tree Toy is a unique and engaging DIY craft project that brings festive cheer while encouraging creativity. Designed as a layered paper-cut toy, it combines artistry with functionality, making it an ideal gift or decorative item for the holiday season. At the core of this project are the Files to Cut, which provide the necessary templates in various formats to allow users to customize their approach—whether using a digital cutting machine or hand tools.
Understanding the 3D Christmas Tree Toy and Its Purpose
This type of toy is not just for children; it’s a versatile decoration that adults can easily assemble and enjoy. The design consists of multiple layers that, when cut and stacked, form a three-dimensional Christmas tree. It's perfect for adding a personal touch to your holiday decor or gifting handmade items to friends and family. The charm lies in its simplicity and the satisfaction of creating something tangible from flat designs.
The Files to Cut include all the elements needed to bring the tree to life. These files are optimized for precision and ease of use, ensuring each layer aligns correctly once assembled. They're especially useful for hobbyists, educators, small business owners, and anyone interested in crafting personalized decorations without requiring advanced artistic skills.
File Formats and Compatibility Considerations
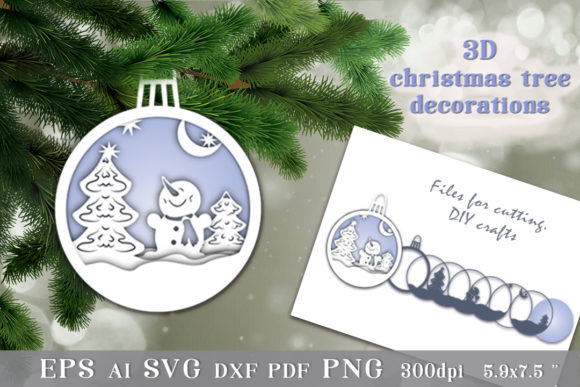
One of the key advantages of the 3D Christmas Tree Toy is the variety of file formats included in the download. You’ll receive:
- A generic file in AI, DXF, and PDF format
- Nine EPS files
- Nine SVG files
- Nine PNG files on transparent backgrounds (300 dpi resolution)
These formats cater to different tools and workflows. For instance, SVG files work well with Cricut and Silhouette machines, while EPS files are compatible with Adobe Illustrator. The PNG images are great for printing or digital use, such as social media graphics or website banners. Before purchasing, ensure you have the appropriate software and hardware to open and utilize these files effectively.
If you’re using a digital cutting machine, check the specifications of your device to confirm compatibility with SVG or EPS files. If you prefer manual cutting, the PDF version is highly recommended for easy printing and tracing. Having the right setup will save time and reduce frustration during the creation process.
How to Use the Files in Your Creative Workflow
Incorporating the 3D Christmas Tree Toy into your creative workflow can be done at several stages depending on your goals:
Before the Project
Planning and Design: Start by reviewing the files to understand how the layers fit together. This helps in selecting the right materials, like cardstock or colored paper, based on thickness and durability. It also allows you to visualize the final product and plan any customizations, such as adding names, dates, or other festive elements.
During the Project
Cutting and Assembly: Once you’ve chosen your method, follow the steps carefully. Digital cutting ensures accuracy and consistency across layers, which is essential for a clean final look. When cutting manually, take your time and use a ruler or cutting mat for precision. After all layers are cut, assemble them by following the instructions provided. A little glue and patience go a long way in achieving a stable and visually appealing result.
After the Project
Display and Gifting: After assembly, the finished toy measures approximately 5.9 x 7.2 inches, making it suitable for display on mantles, shelves, or as part of a larger wall art piece. Alternatively, package it as a gift. Add a small note or ribbon for a more personalized feel. The compact size also makes it ideal for including in advent calendars, holiday cards, or party favors.
Integration with Other Tools and Resources
To maximize the potential of the 3D Christmas Tree Toy, consider integrating it with other resources and tools:
- Digital Cutting Machines: Use the SVG or EPS files with your Cricut, Silhouette, or similar devices. These machines streamline the cutting process, especially if you plan to make multiple copies for gifts or events.
- Design Software: If you want to personalize the design further, import the AI or EPS files into Adobe Illustrator or Inkscape. Here, you can adjust colors, add text, or modify the layout to suit your aesthetic preferences.
- Printing Services: The high-resolution PNG files are excellent for sending to professional print shops. Whether you need bulk prints for resale or classroom projects, these files ensure crisp edges and vibrant colors.
- Storage and Organization: After cutting, store individual layers in labeled folders or plastic sleeves to keep them safe and organized. This is particularly helpful if you’re planning to make multiple trees or reuse the same template next year.
Combining the 3D Christmas Tree Toy with these tools allows you to scale up production or enhance the quality of your output, depending on your needs.
Practical Tips for Implementation
Here are some actionable tips to help you implement the 3D Christmas Tree Toy smoothly into your crafting routine:
- Test Materials First: Before cutting all the layers, do a test run with one set using scrap paper or lightweight cardstock. This helps identify any issues with alignment or tool settings.
- Layer Order Matters: Pay close attention to the order of the layers when assembling. Incorrect stacking can affect the visual appeal and structural integrity of the toy.
- Use Quality Adhesives: Choose strong but clear glues like double-sided tape or white glue to hold the layers together securely without leaving visible residue.
- Customize Thoughtfully: If adding names or messages, ensure they don’t interfere with the structural parts of the tree. Keep customization subtle and intentional for the best results.
- Batch Processing for Efficiency: If you're making several trees, batch-cutting all layers at once can significantly speed up the process. Group similar color sets together to maintain efficiency and consistency.
Use Cases and Real-World Applications
The 3D Christmas Tree Toy isn't limited to a single application. Here are a few practical use cases where it can add value:
- Gift Packaging: Attach the completed tree to gift boxes or tags as a festive embellishment. It adds a tactile and visual element that stands out from standard bows or ribbons.
- Classroom Activities: Educators can use the files in art classes or holiday-themed workshops. The project encourages fine motor skills, spatial awareness, and collaborative creativity.
- Business Promotions: Small businesses can create branded versions of the toy by incorporating logos or slogans. These can be given as freebies at holiday markets or used in seasonal packaging.
- Home Decor: Assemble multiple trees in varying sizes and colors to create a layered wall hanging or mobile. It’s a charming addition to holiday displays and can be reused year after year.
- Personalized Keepsakes: Create a special edition tree for each family member or friend, customizing it with initials, birth years, or meaningful symbols.
By adapting the design to different scenarios, the 3D Christmas Tree Toy becomes more than just a decoration—it transforms into a versatile asset for both personal and professional purposes.
Ensuring Long-Term Use and Reusability
While the 3D Christmas Tree Toy is intended for the holiday season, thoughtful planning can extend its usability:
- Reusable Templates: Store the original digital files in a dedicated folder so they can be accessed year after year. This saves time and effort in future seasons.
- Durable Materials: Use thicker cardstock or even foam board for added longevity. These materials resist damage better and can be displayed more prominently.
- Modular Design Ideas: Experiment with modular variations of the tree, such as detachable ornaments or interchangeable bases. This adds flexibility and reusability for different themes or occasions.
- Repurposing Old Trees: If a tree gets damaged, disassemble the layers and repurpose them into new designs or donate them for community crafts. Creativity doesn’t end with one use.
Considering these factors upfront ensures that your investment in the 3D Christmas Tree Toy remains valuable over time.
Quality Control and Consistency
Maintaining quality throughout the process is crucial, especially when producing multiple units or using the toy in a professional setting:
- Consistent Cutting Settings: If using a digital machine, document the blade depth and pressure settings for optimal cuts. This helps replicate the same results across batches.
- Material Uniformity: Stick to the same type and weight of material for all layers to avoid inconsistencies in color, texture, or durability.
- Alignment Checks: During assembly, frequently check that each layer lines up correctly. Even minor misalignments can impact the overall appearance.
- Final Inspection: Once assembled, inspect the toy for sharp edges, glue smudges, or loose connections. Addressing these issues early prevents poor-quality outputs from being distributed or displayed.
Attention to detail at every stage ensures that the final product reflects the care and effort put into its creation.
Getting Started with Your Own 3D Christmas Tree Toy
Creating a 3D Christmas Tree Toy is straightforward, but preparation is key. Begin by gathering your preferred cutting tools and materials. If using a digital machine, load the SVG or EPS files and calibrate the machine accordingly. For manual cutting, print the PDF and prepare your scissors or craft knife.
Once the pieces are ready, lay them out in order before applying glue. Some creators find it helpful to number the layers beforehand for easier assembly. After everything is glued and dried, give the toy a gentle shake to test its stability. A well-assembled tree should stand upright and hold its shape without wobbling.
Consider organizing your workspace to streamline the process. A clean, clutter-free area with all supplies within reach improves efficiency and reduces errors. Also, think about how many trees you'll need and whether you want to offer variations in color or style.
Conclusion
The 3D Christmas Tree Toy offers a delightful blend of art and function, making it a standout project for those who enjoy hands-on crafting. With the Files to Cut provided, you have the freedom to choose your preferred method of production—digital or manual—while ensuring precision and ease of use. By integrating these files into your existing creative or business processes, you unlock opportunities for personalization, scalability, and reusability.
Whether you're an educator looking for engaging activities, a small business owner aiming to boost holiday sales, or simply someone who enjoys DIY crafts, this project fits naturally into your workflow. Just remember to plan ahead, check compatibility, and maintain quality control to get the most out of your materials and time.
Thanks for visiting our store—if you have any questions or need assistance with the files, don’t hesitate to contact us. Happy crafting and merry holidays!